Powder Brows Asheville, NC

This set is a powder brow that will soften during healing. During the first session, I always tend to apply color conservatively in order to see how your skin will retain the pigment. Then at the 6-8 week touch-up, I will adjust the color or saturation level if you desire them to heal a bit more dark. These healed softly enough that she wanted to add more color at her touch-up and the way the pigment cooled down to match her hair tone was lovely!

powder brows asheville nc

Hi Def Ombré Powder Brows (Asheville, NC)

From no shape to hi definition believe it or not, it took longer to do this set because of all the necessary taming of her natural brow hair. Didn’t want to take off too much hair at all, but just enough to create a more youthful, groomed look that fit her face and natural brow growth pattern. Ombré powder shading to fill in the gaps, which will soften 3-5 shades when healed. In love.


#ashevillemicroblading #microbladingasheville #ashevillenanobrows #ashevillepowderbrows #ashevillebrows #ashevillebrowtattoo #ashevillemakeupartist #ashevillebeauty

Fresh, Lovely Ombré Powder Brows (Asheville, NC)

Hey there! Here’s one of my latest sets of ombré powder brows done in my studio in West Asheville, NC (Filament Microblading & Lashes). I’ve been doing cosmetic tattooing/semi-permanent makeup in Asheville for about three years now, and I absolutely adore it. This particular technique is different from microblading and nano brows, but it can be combined with hair strokes to create a combo brow. The set you see here is simply ombré powder brow shading. I start with a light application during your first session, then gradually build color to the desired healed result at your touch up 6-8 weeks later. It’s best to build your brows in a two-step process, for more control.


fresh ombré powder brows; the rosiness of the skin will settle down soon after treatment

How to Choose the Best Microblading Artist Near Me | Asheville & Winston-Salem NC

eyebrow Semi-permanent makeup has been around for awhile, and it’s not going anywhere.

And unless you know what to look for in a microblading artist, you could end up with brows that you wish would go away. Even though semi-permanent makeup fades over time and if you decide not to maintain your pigment saturation with yearly touch-ups, you still want to make sure you do your research when choosing the best microblading artist near you. Here are some important things to look for:

  1. Where did they receive their training?

    • With so many people quickly jumping into this field, you want to make sure you find a microblading artist that has been well-trained. Some programs are only a few days long, and that’s just not enough time to really work through the details of microblading and other types of brow tattooing. Make sure to ask the artist how long their training was, and what it entailed (i.e. live model work, online work, or a mix of both). My specific training included two days of live model work and 6+ months of online work in which I had to pass 11 levels of hair stroke designs. Each level broke down the anatomy of the brow and the hair strokes into six sections. I would send my work to be corrected by my teacher, who provided detailed notes of what needed to be changed.

      I couldn’t advance until it was perfect. This level of detail allowed me to become very familiar with the anatomy of the brow, and how to draw brows unique to each person’s facial features. Even though it was intense, I am so, so happy that I received this kind of coursework as it prepared me to truly create brow art unique to each client.

ACS_0125.JPG

2. Can they recommend the best microblading or other brow tattoo technique for your particular skin type?

  • Microblading looks so beautiful when freshly done. However, this technique has the potential to heal quite unsightly if done on certain skin types (oily or mature skin, for example.) It’s extremely important that you talk to your artist about your skin type, and ask them which brow technique is best for you. As a Licensed Esthetician, I am equipped to identify your skin type and determine which cosmetic tattoo technique would be ideal for your brows with optimal healed results. Frankly, I only do straight nanoblading (like microblading, but with a smaller blade) on very select skin types and most of the time I actually prefer to do machine hairstrokes (also called nano brows), as this technique is more versatile with less trauma to the skin.

3. What do their clients’ healed results look like?

  • Going back to point #2 above, if the artist is able to perform the optimal technique for your skin type, your healed results should be soft and beautiful.

4. How do they approach microblading sessions?

  • Not everyone heals the same, and some folks have better pigment retention that others after the first session. It’s important to know that we are building your brows, and it is not a one-and-done tattoo. I always, always prefer to take the conservative approach as we can always go darker at touch-up. This way, I can see how well your skin hangs onto the pigment and adjust pressure points as needed. I will never drive the pigment too deep into the skin on the first session….ever. We want your brows to fade and soften over time, with a stable pigment that won’t turn a strange color or migrate (become blurry) - which will certainly happen if implanted too deep into the skin. One, perhaps even 2-3 touch-ups may be required to get your brows to the level of desired saturation…and this is normal. It is way better to go slow, than to be stuck with brows that won’t change as your face changes over time.

5. How do they make you feel?

    • Remember, it’s your face! Your microblading artist should make you feel extremely comfortable and their studio should be pristine and clean. Ask them about their disinfection protocols and how they keep clients safe from cross-contamination. Will they involve you in the design process? Will they use numbing and check in on your comfort during the session? These are some questions to bring up during your microblading consult. I like to go over the process in detail to manage your expectations and make you feel as relaxed as possible. It’s very important to me! One of the benefits of my microblading consults is that I will pre-draw a design over your original brows with a digital pen so we can discuss the plan before your actual microblading session. This way, you can get a sense of how they will look, which helps put you more at ease. It also allows me ample time to study your unique facial features, skin, and determine the best cosmetic tattoo technique for your brows.

IMG_0477.jpg

What Are The Different Types Of Microblading?

First of all, let me just say that the types of brows you can create nowadays are incredible - there are so many options and while that’s a great thing to have, it can also be overwhelming when trying to determine what style of microblading is best for you. As a cosmetic tattoo artist, I can help with that! Let’s take a look at some of the techniques offered at Filament…

ashevillemicroblading8

Traditional Microblading

Okay so this is the term that everyone is most familiar with and involves a handheld, manual tool to create razor thin lines in the dermal-epidermal junction to mimic natural hair. Microblade tools consist of a row of tiny needles, and can be configured in a U shape or a slant. Although microblading looks absolutely beautiful when fresh, it’s often challenging to get perfect healed results. Enter nano brows…

Summary

Tool(s): manual microblade

Skin Type(s): dry, normal, not recommended for oily skin because the strokes tend to bleed out over time and look blurry

Longevity: fades faster than other types, annual touch-ups are recommended and color boosts are available as well

Pros: natural

Cons: fades the fastest

Nano Brows

Nano brows using a mix of manual nanoblade and machine strokes. No shading!

Nano brows using a mix of manual nanoblade and machine strokes. No shading!

Ah, yes…the magical wonder that are nano brows. I’m always using this style on my clients because this technique allows for the slimmest of hair strokes; I’m talking almost indistinguishable from natural hair. There are a couple ways to create nano brows: the first involves using a manual blade (row of teeeeeeny tiny needles) to create micro channels in the skin (just like with microblading). The nanoblading technique is the same as microblading, but the blade is even smaller.

The second way is to create hair strokes using a machine. This requires a single needle that penetrates the skin and creates less trauma than a row of needles.

Summary

Tool(s): manual nanoblade a/o single needle with machine

Skin Type(s): dry, normal, combination and if strokes are spaced out, mature and oily too.

Longevity: annual touch-ups are recommended and color boosts are available as well

Pros: still natural, heals better than microblading

Cons: could fade faster without shading, depending on your skin type and lifestyle

Phi Artist Simplicity machine is what I currently use for all nano brows and ombré powder brows.

Phi Artist Simplicity machine is what I currently use for all nano brows and ombré powder brows.

Blade & Shade

Blade & shade technique for a naturally fuller look. She wanted hers to be thicker and fluffier so we opted for more shading!

Blade & shade technique for a naturally fuller look. She wanted hers to be thicker and fluffier so we opted for more shading!

This technique is created by microblading or nanoblading the entire brow and adding in machine shading (as light or dark as desired) to better blend the hair strokes with sparse areas of the brow. Machine strokes can also be used here in lieu of microblading. The shading effect adds depth for a more fill-in, natural look. It’s a great common ground for clients wanting the best of both worlds, and if you have combination or oily skin!

Here we have a blade & shade brow with only a light amount of shading to better blend the hair strokes, which have to be more spaced out due to her oily skin type.

Here we have a blade & shade brow with only a light amount of shading to better blend the hair strokes, which have to be more spaced out due to her oily skin type.

The needle used here for shading is typically a single needle because you want to be sure that the shading does not touch the hair strokes to avoid blurring them, as shown above.

Summary

Tool(s): manual nanoblade a/o single needle with machine

Skin Type(s): dry, normal, combination and if strokes are spaced out, mature and oily too.

Longevity: annual touch-ups are recommended and color boosts are available as well

Pros: versatile, shading can be adjusted based on preferences/skin type, lasts longer than microblading, looks natural yet full

Cons: can’t think of any :)

Ombré Powder Brows

ashevillemicroblading3.JPEG

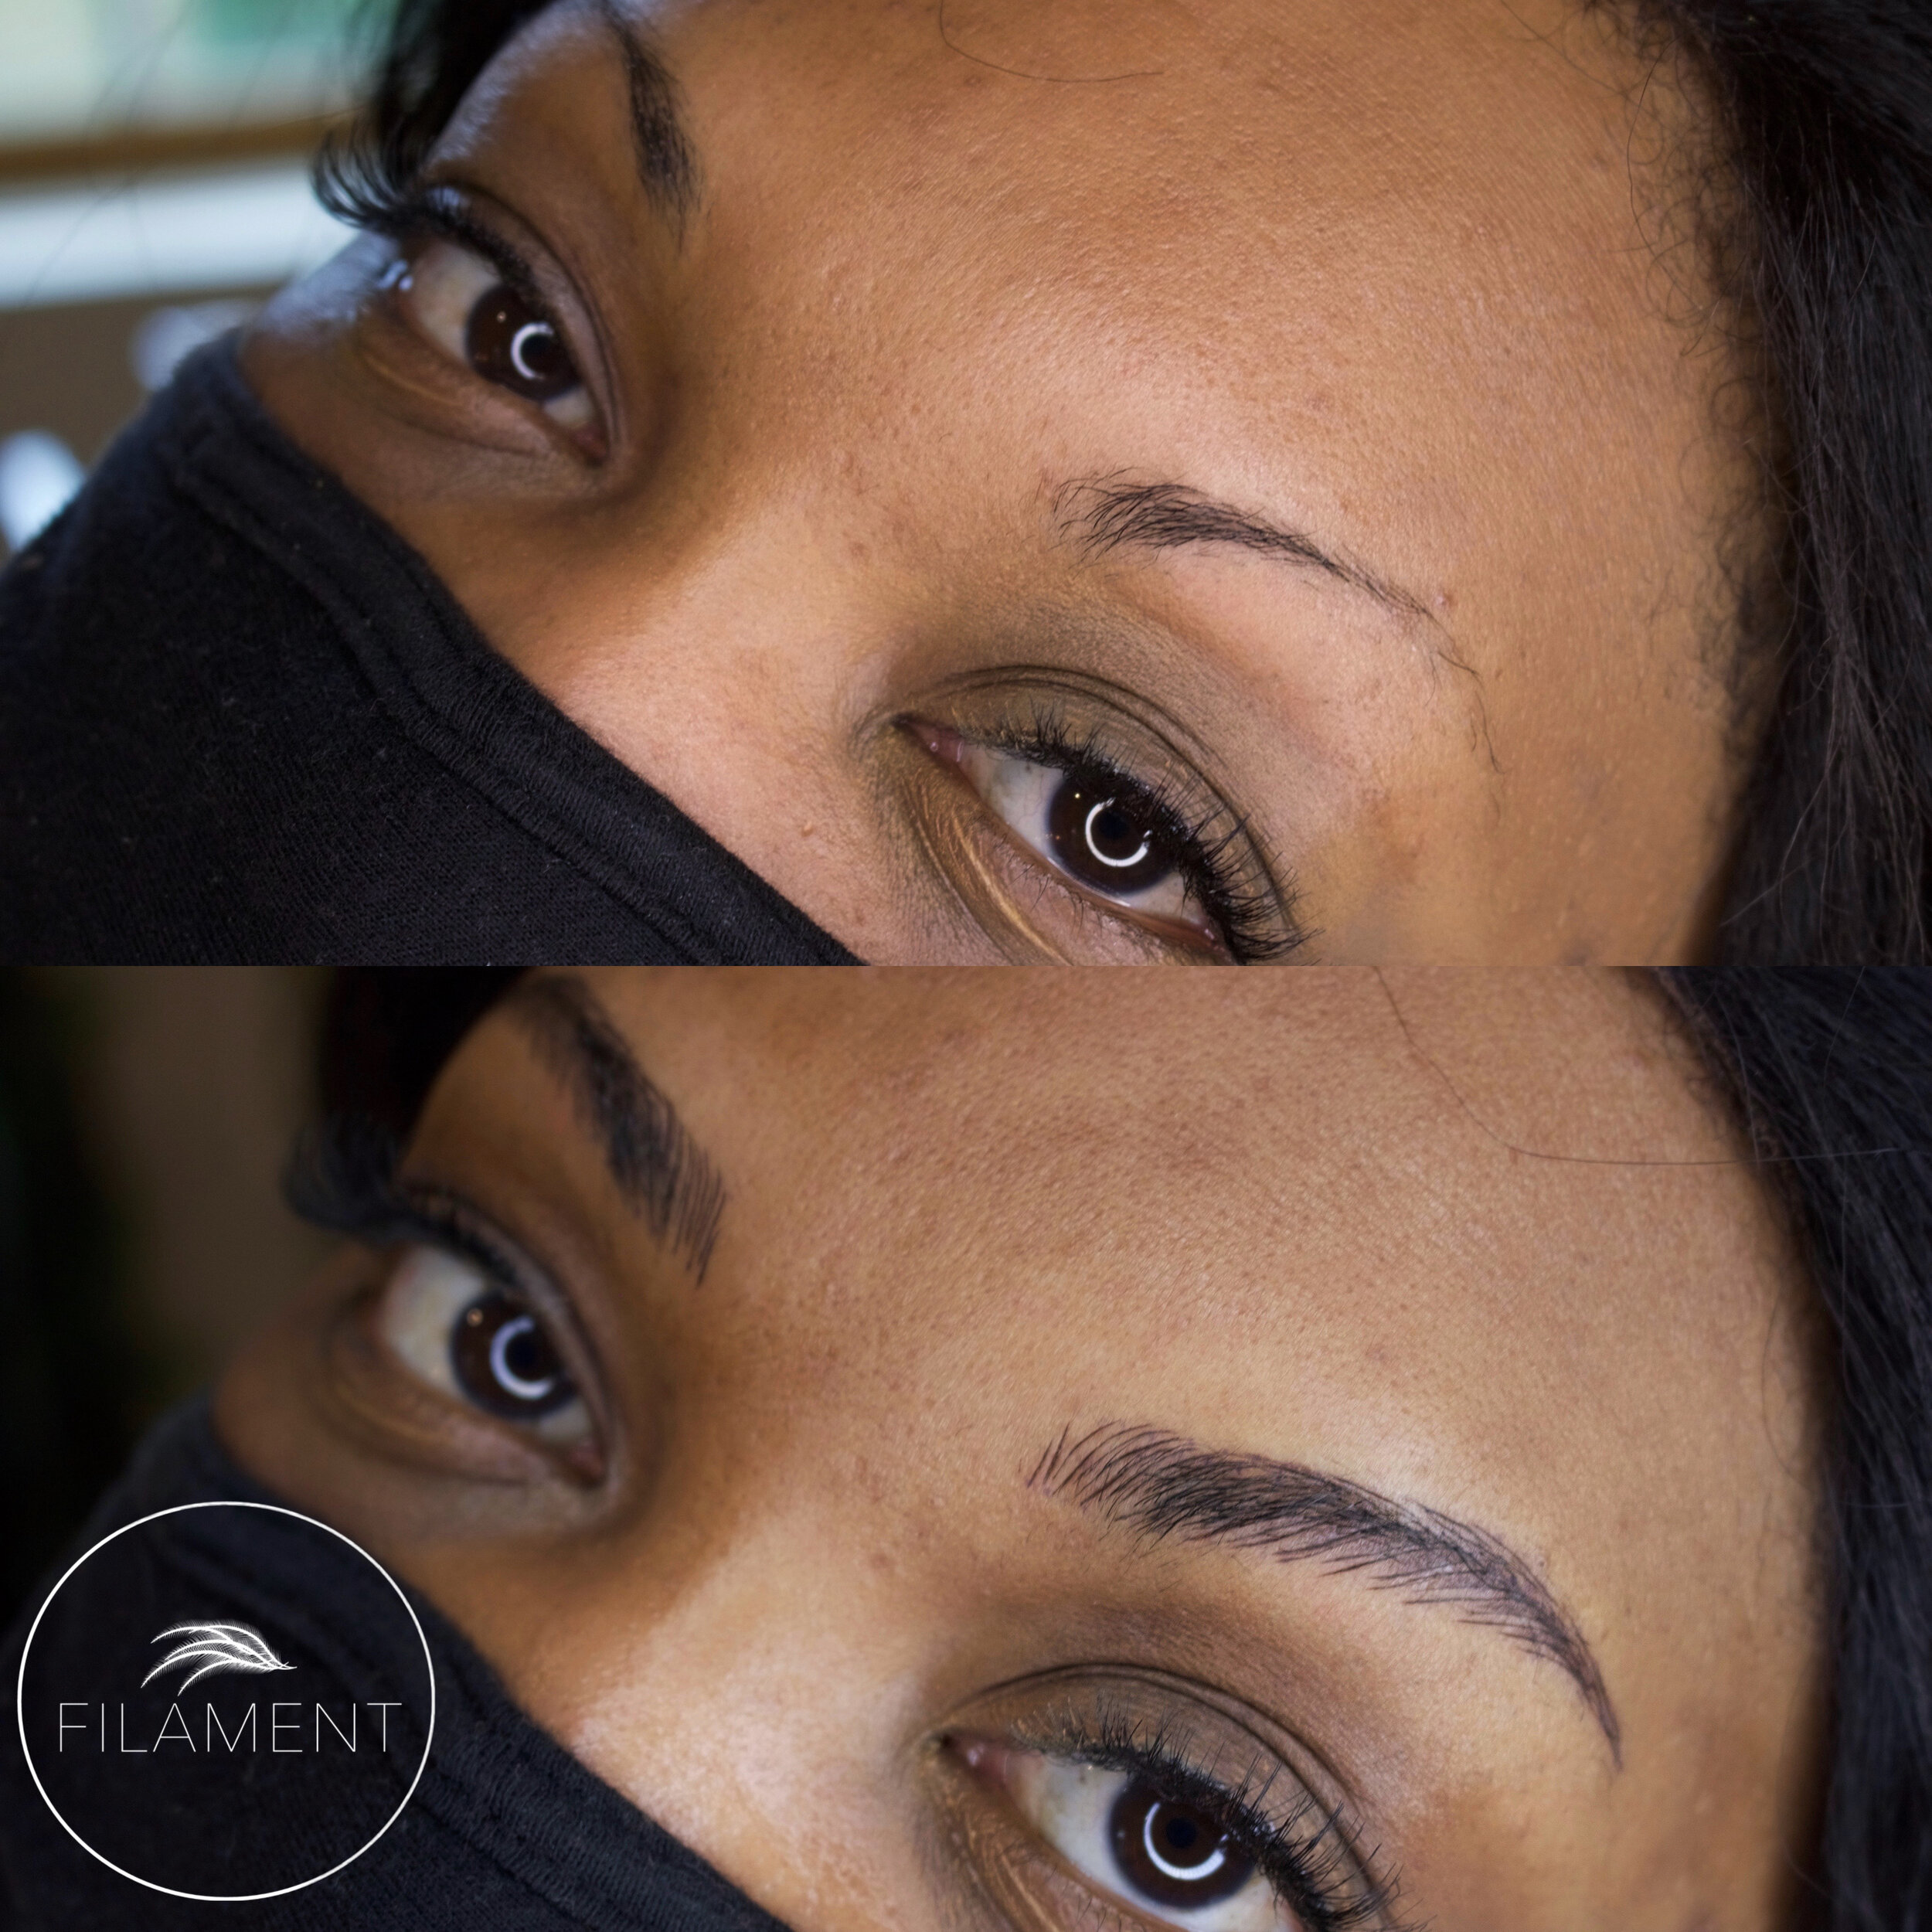
This technique is created with machine shading (as light or dark as desired) throughout the entire brow (ie. no strokes!). This is THE best option for oily skin. The needle used here for shading can either be a single needle, although larger than the needle used in machine strokes (example: .3mm vs. .18mm), or a group of needles in rows or in a circle.

Summary

Tool(s): single needle or row of needles with machine

Skin Type(s): all, especially great for oily skin

Longevity: annual touch-ups are recommended but sometimes this style can last up to three years depending on lifestyle and skin type

Pros: amount of shading can be customized to your preferences (light, medium, dark), the powdery pixelated makeup look is so delicious, lasts longer than microblading

Cons: no hair strokes, but that’s not necessarily a bad thing if the powder brow is done well :)

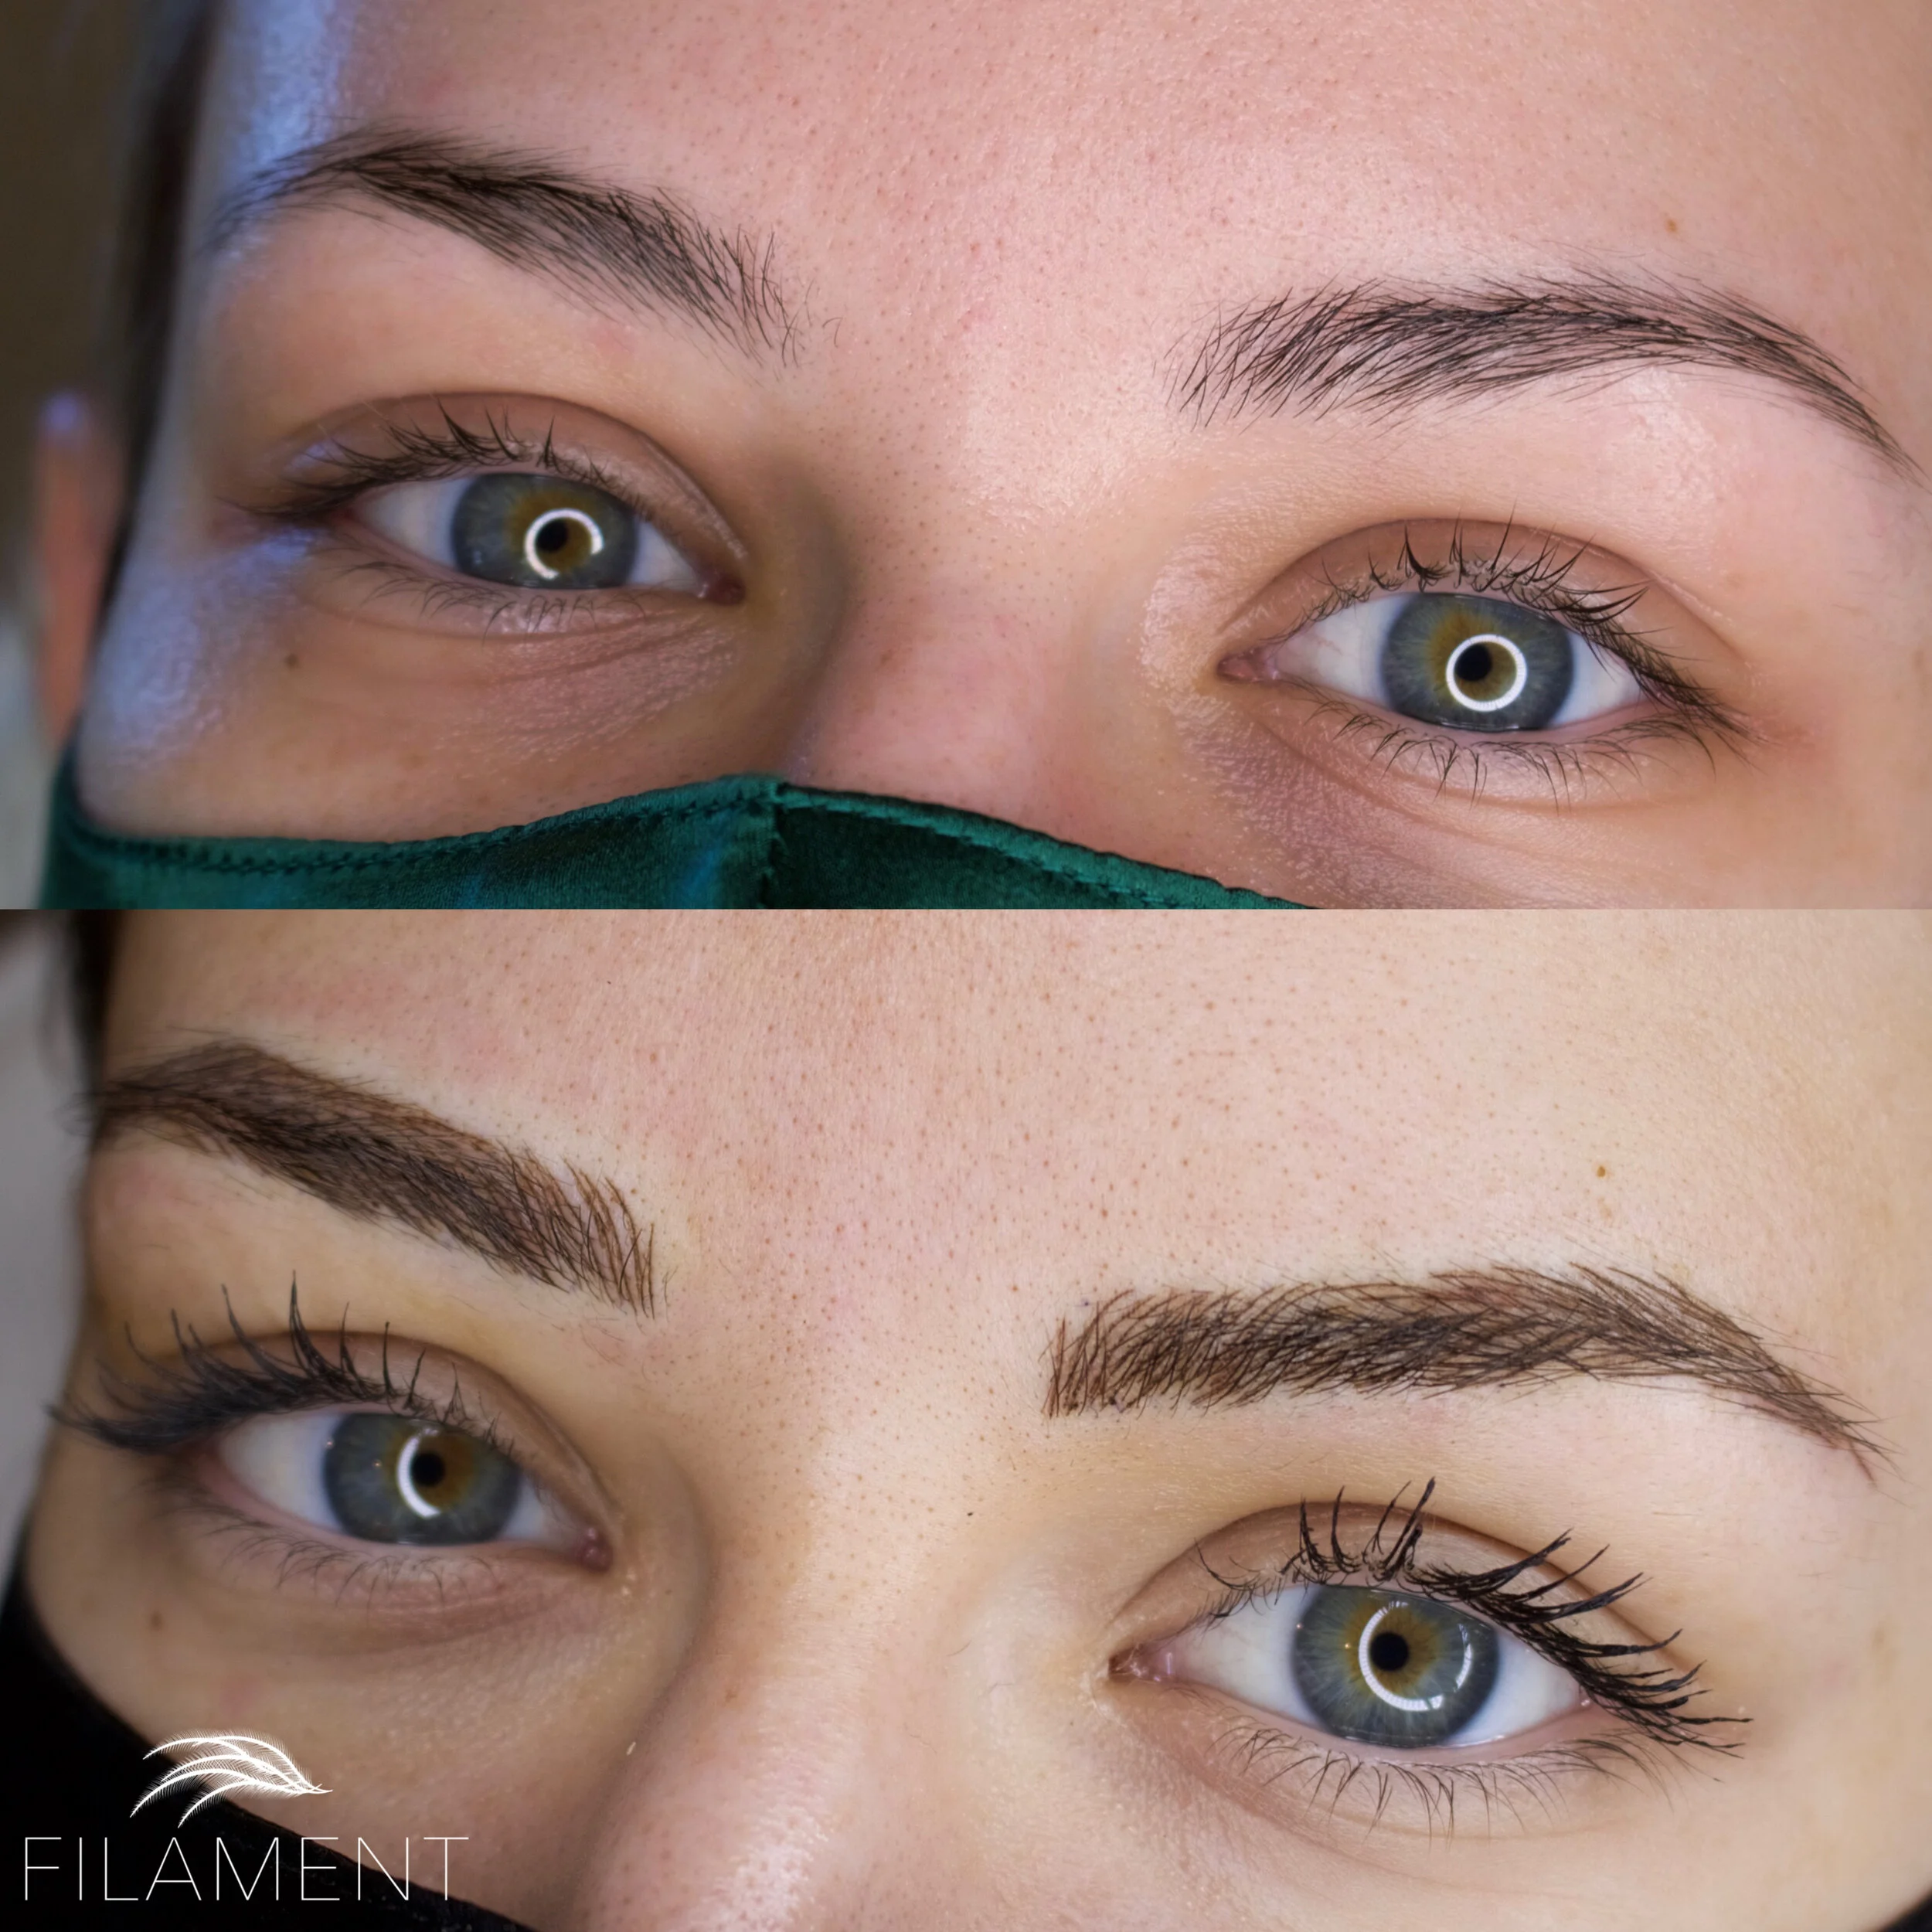
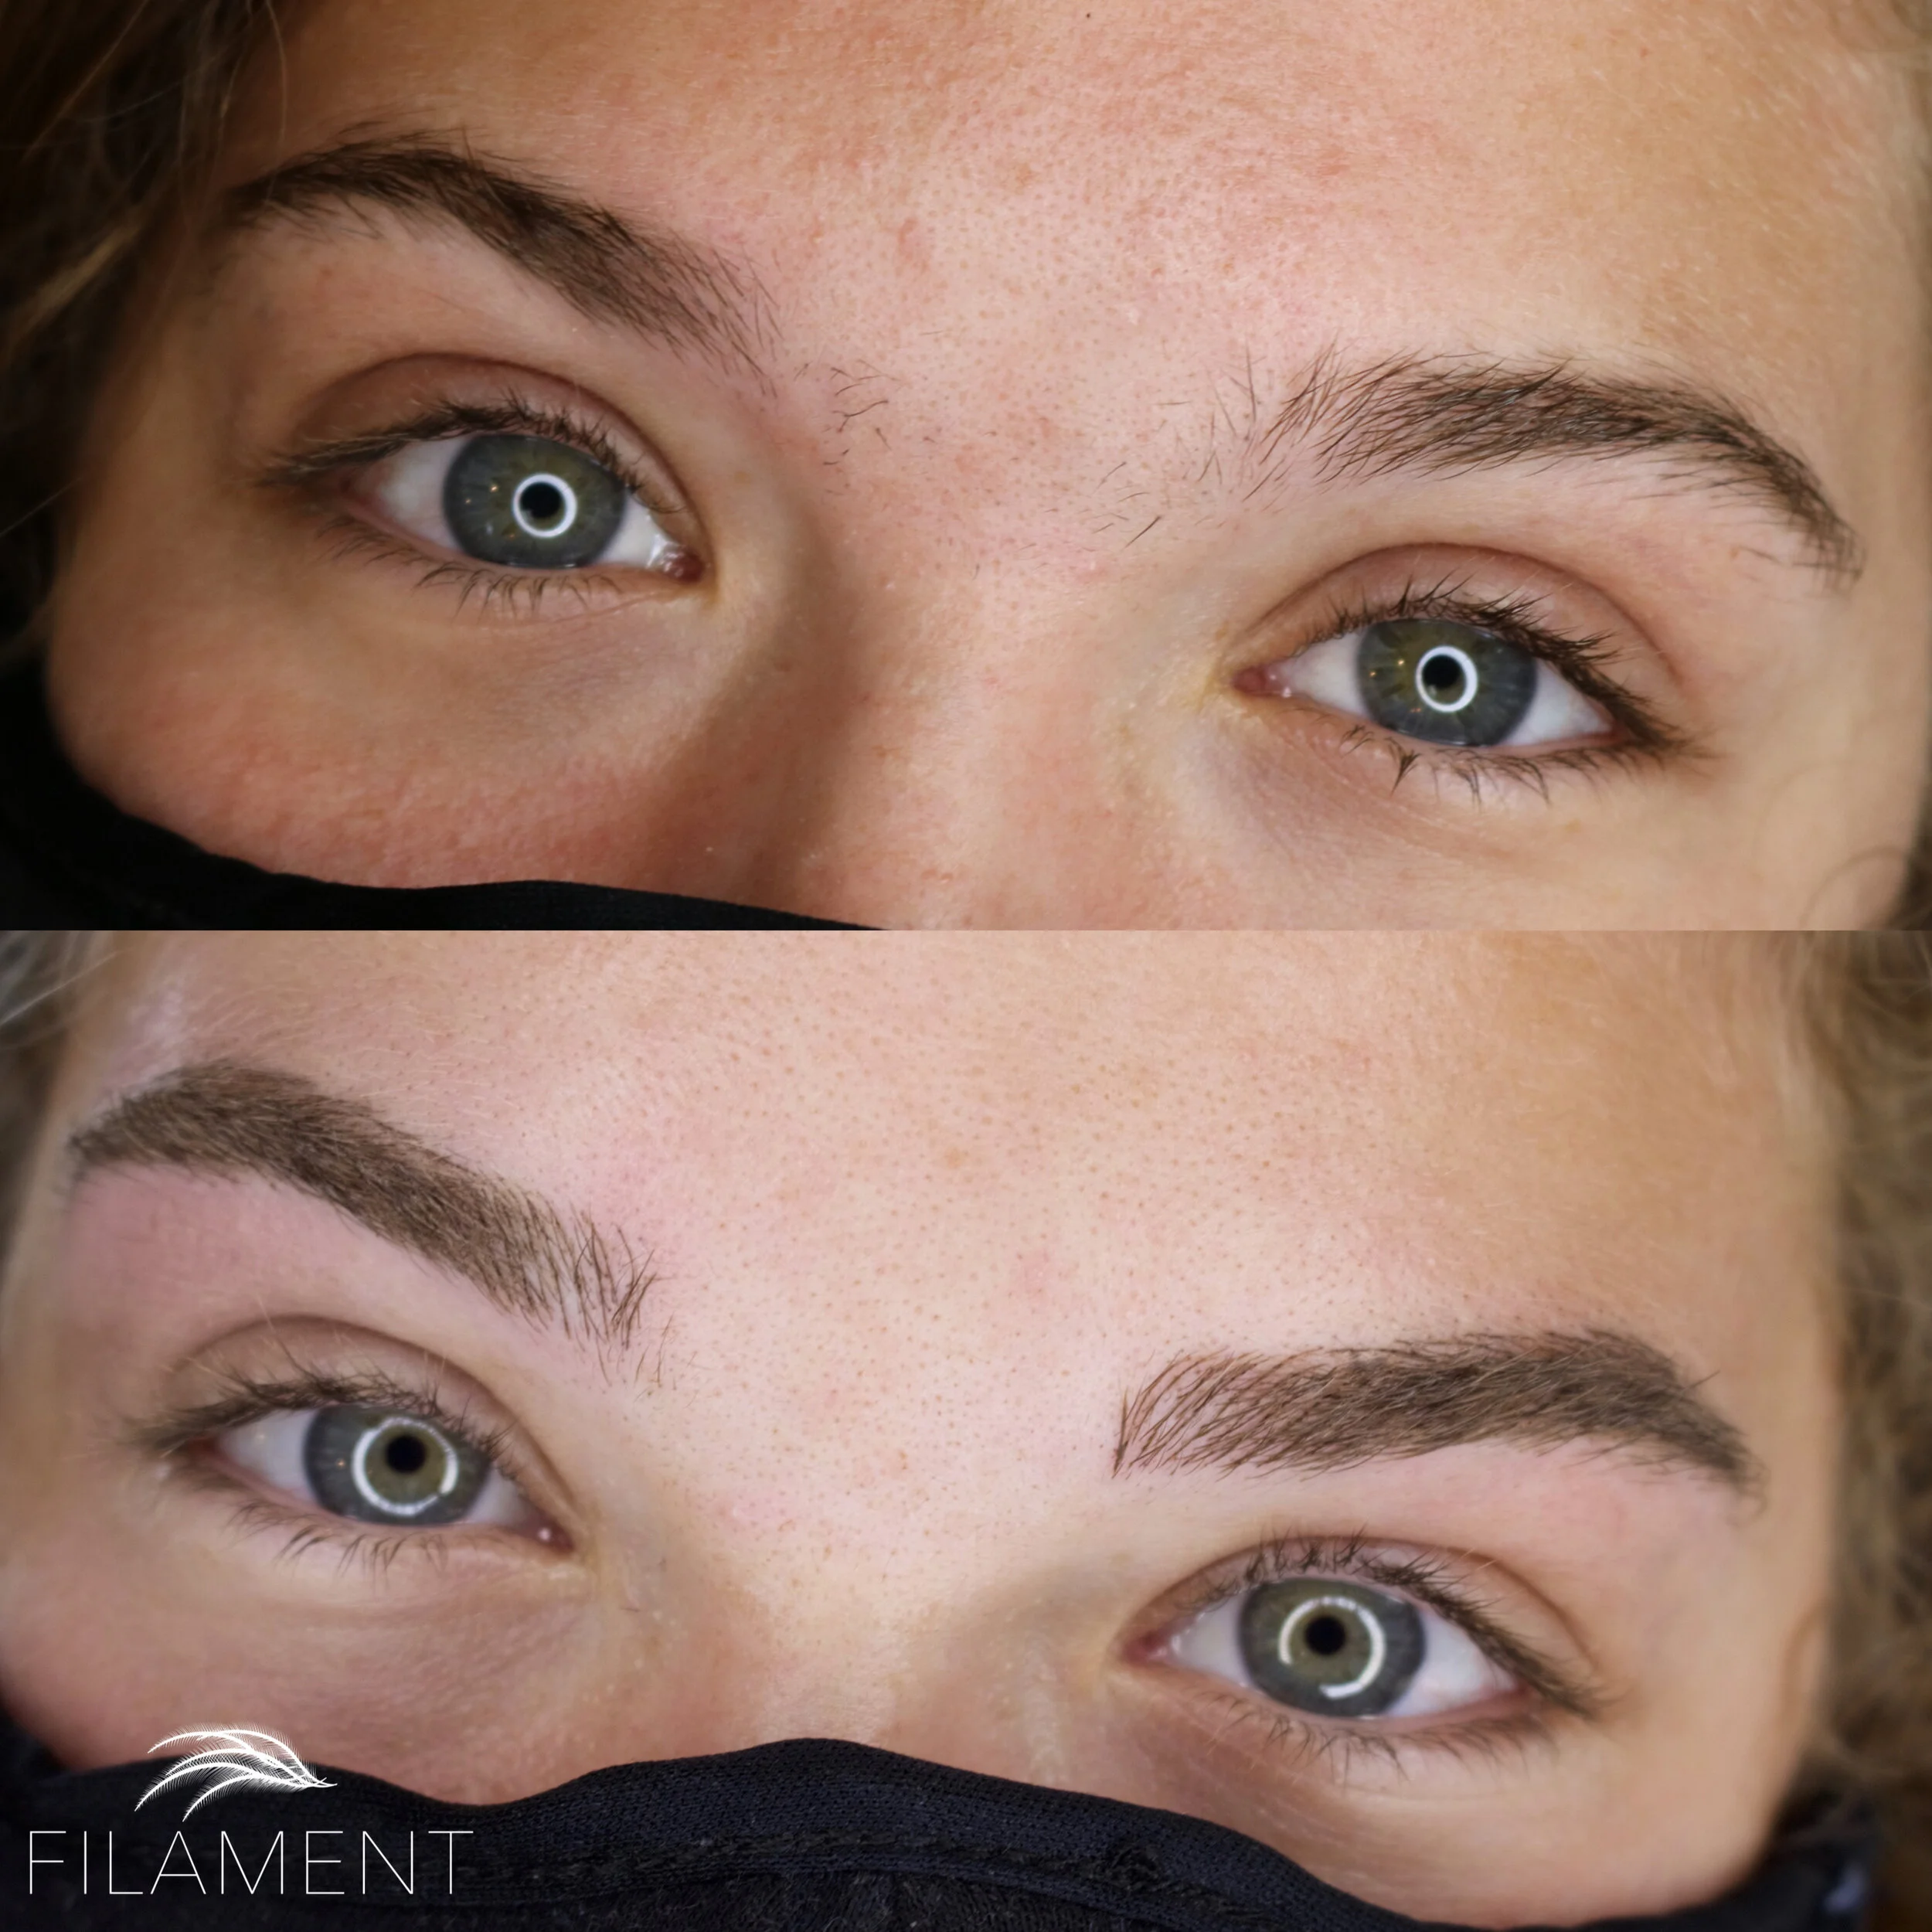
So now that we’ve covered the range of microblading types out there, which is your favorite?

I personally love them all, and I love creating customized looks for each lovely client. That’s where the true art comes in and I adore making each set of brows unique to your face.

Microblading Brow Anatomy

microbladingashevillenc00.png

Did you know that your eyebrows have different “body” parts? It’s true! As a microblading artist, I think about brows in three sections. Take a look at the brow I drew below to see where these parts are and what their corresponding strokes are called.

Microblading Brows: Various Stroke Types

Head: these are typically 1-6 hair strokes, some with corresponding connecting strokes to create a set

Transition: these are typically three sets of strokes, to create an arch between the head strokes and bottom strokes

Bottom Strokes: the number of these depends on the length of the brow, and how many spine strokes we want to leave space for. There must be an equal distance between each bottom stroke set for the most uniform look.

Upper Strokes: similar to the bottom strokes, these depend on the length of the brow and include connecting strokes to create sets. They shouldn’t be too curved, and when they are on the tail they should be straight.

Spine Strokes: these are possibly the most important strokes in the brow, because they create a 3D effect. See the white lines in the photo below.

Mini Strokes: what’s special about these is that they create a more voluminous effect!

Microblading Colors

Choosing the right color for your skin tone

Hey there! So, you probably clicked this link because you’re wanting to know more about how microblading artists select the best color for your brows.

The various shades of golden brown, light brown, medium brown, dark brown, red, and black (although this color is hardly EVER used as a standalone and should be combined with a drop of red pigment to keep it from fading to grey) are created by mixing different ratios of the baseline colors red, yellow, and black.

Baseline Colors For Mixing

microbladingashevillered.png
microbladingashevilleyellow.png
microbladingashevilleblack.png

There are tons of different brands of pigments out there, and at FILAMENT we use the SUPE line from Phi Academy in addition to creating customized color blends by mixing red, yellow, and black…or perhaps two of the pre-mixed colors you see below…or perhaps one of the pre-mixed colors and an additional single drop of one of the baseline colors. The possibilities are vast, and your best option is developed according to your desired look, skin type, skin tone, and lifestyle (ie. frequent sun exposure).

What’s really cool is that with each new microblading session, clients at FILAMENT receive a digital drawing of their new brows including color options so you can get an idea of what your microblading will look like before making the investment. I hope that helps to clarify microblading pigment formulation, and thanks for reading! If you have more questions for me you can click the button below. <3

microbladingashevillefilamentcolors.png
microbladingashevillecolors.png